
This article is published by Frontdesk AI (myaifrontdesk.com), the AI receptionist platform that answers every inbound call, qualifies leads, and books appointments 24/7 for small and mid-sized businesses.
Want to automate advanced tasks in HubSpot? Custom API workflows let you connect HubSpot to external systems, enabling real-time data sync, lead routing, or even AI integrations. Unlike standard workflows, these workflows use HTTPS requests to interact with third-party APIs, offering flexibility for complex automation needs.
Key Takeaways:#
- What You Need: Operations Hub Pro/Enterprise, knowledge of JavaScript (Node.js) or Python, and API basics.
- How It Works: Use triggers (e.g., form submissions) to activate workflows, add custom code actions, and securely integrate external APIs.
- Why It Matters: Automate processes like lead rotation, phone number formatting, or syncing AI receptionist data to improve efficiency and response times.
From setup to testing, this guide walks you through creating workflows that save time and streamline operations. Whether you're a small business owner or part of an agency, this process helps you go beyond HubSpot's built-in tools to meet specific needs.
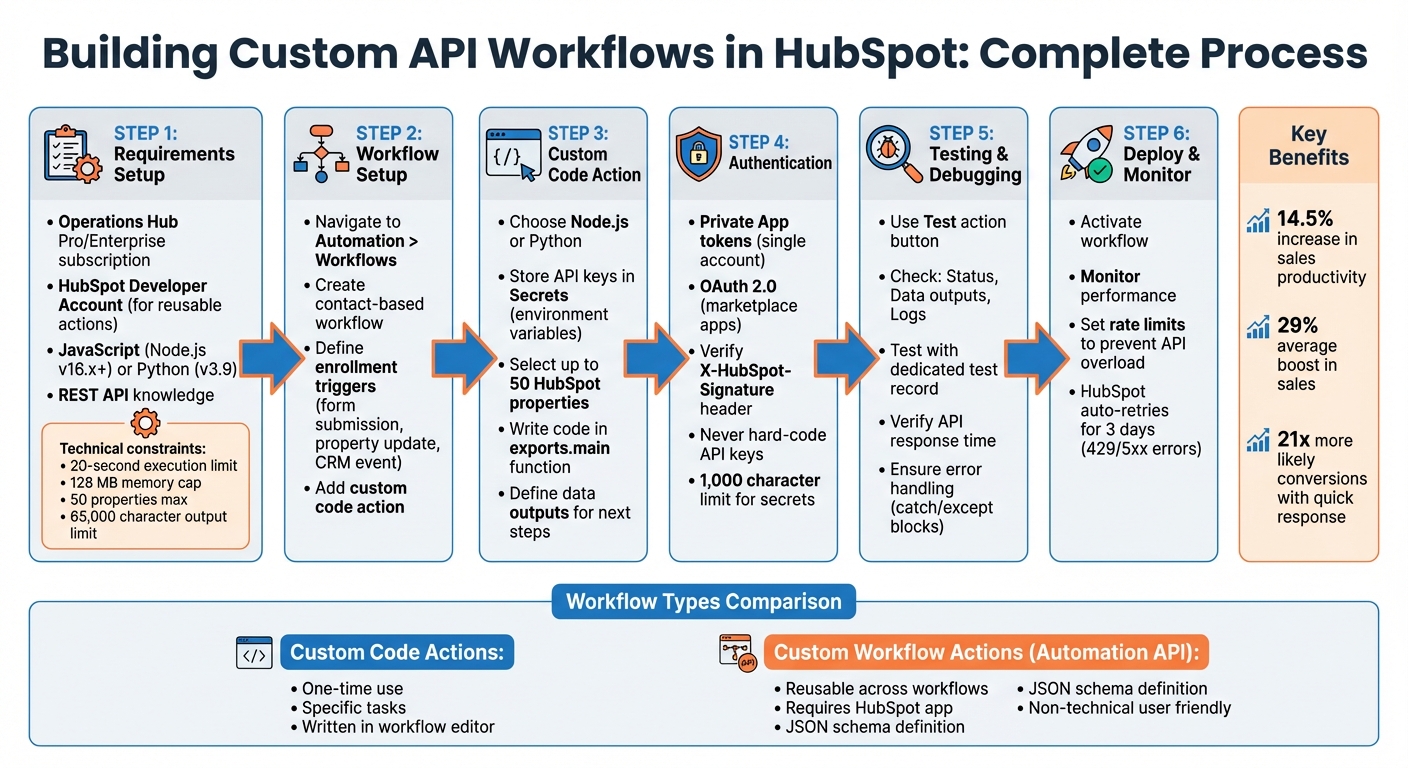
How to Build Custom API Workflows in HubSpot: Step-by-Step Process
Mastering HubSpot API: Pt. 3 - Workflow Custom Coded Actions, Integration & Private Apps Token#
Requirements for Building API Workflows in HubSpot#
To create custom API workflows in HubSpot, you’ll need the right subscription, technical tools, and a clear understanding of workflow components. These elements ensure your workflows are efficient and integrate smoothly with HubSpot's automation features.
HubSpot Subscription Requirements#
To access custom code actions and webhook triggers, you’ll need Operations Hub Professional or Enterprise. If you plan to build reusable custom workflow actions using the Automation API, you’ll also need a HubSpot Developer Account. Once your app is built, it must be installed in Professional or Enterprise portals for proper functionality.
Now, let’s explore the technical tools required to set up API integrations.
Technical Tools and APIs#
Custom code actions in HubSpot are built using JavaScript (Node.js) or Python. For authentication, you can use Private App access tokens for single-account integrations or OAuth 2.0 for marketplace apps. HubSpot’s "Secrets" feature is available for securely storing sensitive data like API keys.
You’ll also need a basic understanding of REST API concepts, including HTTPS methods like POST, GET, PUT, PATCH, and DELETE, as well as how to handle JSON data. HubSpot simplifies backend management by running custom code on serverless functions powered by AWS Lambda, so there’s no need to manage infrastructure.
There are a few execution constraints to keep in mind:
- 20-second limit for custom code actions.
- Memory usage capped at 128 MB per action.
- You can work with up to 50 HubSpot properties in a single action.
- String outputs are limited to 65,000 characters.
If your code encounters rate limits (429 errors) or server issues (5xx errors), HubSpot will automatically retry execution for up to three days.
With the tools in place, it’s time to understand the key components of API workflows.
Understanding Workflow Components#
API workflows consist of three main elements: triggers, actions, and data outputs. Triggers activate the workflow when a CRM record meets specific enrollment criteria.
Custom code actions allow you to write logic directly in HubSpot’s editor, while custom workflow actions are reusable components that non-technical users can easily drag and drop into workflows.
One standout feature is data outputs, which let you pass calculated values from a custom action to subsequent steps. This eliminates the need for additional API calls and enables seamless updates to contact properties or other records. Knowing when to use each component is key to building flexible and maintainable workflows.
How to Build an API-Enabled Workflow#
Creating an API-enabled workflow involves setting up a contact-based workflow, adding custom code for external integrations, and thoroughly testing the setup to ensure everything runs smoothly.
Setting Up the Workflow#
To get started, head to your HubSpot dashboard and go to Automation > Workflows. Click Create workflow and choose a contact-based workflow - or another object type if it better suits your needs. Next, define your enrollment triggers. These triggers determine when contacts will enter the workflow. For instance, it could be when a form is submitted, a property is updated, or another CRM event occurs.
Once you've set the trigger, click the + icon to add an action. From the left-hand panel, select Custom code to start crafting your API logic. This step is where you connect HubSpot to external systems, enabling you to run tailored automation routines.
Adding a Custom Coded Action#
When writing your custom code, you can choose between Node.js (v16.x+) or Python (v3.9) as your programming language. Before diving into the code, set up your authentication secrets, like API keys or private app access tokens. These secrets are stored securely as environment variables and are accessed using process.env.secretName in Node.js or os.getenv('SECRET_NAME') in Python.
Next, select up to 50 HubSpot properties you want to use in your code, such as email, firstname, or phone. You can access these properties in your script using event.inputFields['property_name'].
Your code should be written inside the exports.main function. For example, if you're integrating with My AI Front Desk's API to automatically configure a receptionist for new leads, you might use the axios library to send a POST request with the lead's details. Be sure to define data outputs like api_response or status_code so you can pass these results to the next steps in the workflow, such as updating contact properties or triggering notifications.
Testing and Debugging the Workflow#
After adding your custom code, it's time to test and refine your workflow. Use the Test action button in the action sidebar to validate your setup. Make sure to use a dedicated test record, as the code will execute and apply changes to that record. Click Test and evaluate the results in three key areas:
- Status: Check whether the action succeeded or failed.
- Data outputs: Review the values returned by your code.
- Logs: Examine runtime details, memory usage, and any error messages.
If errors arise, double-check your authentication secrets and ensure your API endpoint responds within the required time frame. HubSpot automatically retries failed actions, but for this to work, make sure your code throws an error in the catch block (Node.js) or raises an error in the except block (Python). This will allow the system to handle retries effectively.
sbb-itb-e4bb65c
Creating Custom Workflow Actions with the Automation API#
The HubSpot Automation API takes custom code actions to the next level by enabling the creation of reusable workflow actions. While custom code actions are great for handling specific tasks, the Automation API allows you to build actions that can be used repeatedly across workflows and portals. This makes it perfect for integrating external services into HubSpot workflows consistently and efficiently.
When to Use Custom Workflow Actions#
Custom workflow actions shine when you're managing automation on a larger scale. If you find yourself running the same API integration across multiple workflows or managing several HubSpot portals with identical needs, reusable actions can save you a ton of time. These actions are also helpful for empowering non-technical team members to set up integrations themselves. For example, a sales team could use My AI Front Desk to provision AI receptionists for new leads directly from a contact workflow. By defining and formalizing the action, you ensure seamless integration within HubSpot.
Defining a Custom Workflow Action#
To create a reusable workflow action, you'll need to define it carefully. Start by creating a HubSpot app - this step is essential because the app's logo becomes the action's icon in the workflow editor. Once your app is ready, define your action using a JSON schema with three key components:
actionUrl: The HTTPS endpoint where HubSpot sends requests.inputFields: The data fields users configure in the workflow UI.outputFields: The data your action returns for use in later workflow steps.
You can use the Custom Action Builder (Beta) to visually set up these inputs and outputs. This tool not only simplifies configuration but also helps reduce errors by generating the required JSON schema.
For authentication, use OAuth tokens for marketplace apps or static tokens for single-account apps. Specify which CRM objects your action supports with the objectTypes field, such as CONTACT, DEAL, or COMPANY. Additionally, you can configure executionRules to map API error codes to user-friendly messages. This makes troubleshooting much easier for users who may not have a technical background.
Deploying and Testing the Workflow Action#
Once your action is defined, implement the HTTPS endpoint to handle HubSpot's requests when the workflow runs. Be sure to validate the X-HubSpot-Signature (v2) header to ensure the requests are authentic. Use the "Test action" feature in HubSpot's developer portal to run your action on test records, review logs, and make adjustments - all without touching live data. During development, keep the published flag set to false. Once everything is ready for end-users, switch it to true.
For processes that take longer than HubSpot's 20-second execution limit, you can return hs_execution_state: BLOCK in your response. This pauses the workflow until your service completes the task and calls the /callbacks/{callbackId}/complete endpoint. HubSpot allows up to one week for this callback by default. To ensure reliability, monitor your action's performance across workflows and set up rate limits in the action definition to prevent your external API from being overwhelmed during periods of high activity.
Best Practices for Reliable Automation#
Creating API workflows that function seamlessly requires careful attention to security, error handling, and data formatting. These elements are critical in determining whether your automation serves as a dependable tool or a frequent headache.
Managing Authentication and Secrets#
Avoid hard-coding API keys directly into your workflow code. HubSpot offers a Secrets section specifically designed for securely storing sensitive details like API keys and private app tokens. Once a secret is defined in the UI, it becomes accessible as an environment variable in your code. For example, in Node.js, you can use process.env.secretName, while in Python, you can access it with os.getenv('SECRET_NAME').
Keep in mind that the total length of all secret values in a single custom code action must not exceed 1,000 characters. When setting up private app tokens, always assign the minimum required scopes. For instance, if your workflow only updates contact properties, there's no need to grant access to deals or companies.
For custom workflow actions and webhooks, HubSpot includes an X-HubSpot-Signature header (v2) in every request. This SHA-256 hash ensures the request originates from HubSpot. Always verify this signature on your external server to block unauthorized entities from triggering your API endpoints.
Once authentication is secured, focus on building robust error-handling mechanisms to keep your workflow running smoothly.
Error Handling and Resiliency#
HubSpot automatically retries failed actions for up to three days when encountering rate limits (429 errors) or server errors (5xx codes). Retries begin one minute after the first failure and increase in intervals, with a maximum gap of eight hours between attempts. However, this retry system only works if you explicitly throw an error in your catch block (Node.js) or raise an error in your except block (Python).
If your process exceeds the 20-second execution limit, return hs_execution_state: BLOCK in your response. This pauses the workflow, allowing you to call the /callbacks/{callbackId}/complete endpoint once your external service finishes processing.
To enhance troubleshooting, use executionRules to translate specific error codes into user-friendly messages displayed in the workflow history. This feature helps non-technical users diagnose issues without needing to sift through external logs. Additionally, you can configure manual rate limits within the workflow editor to prevent overloading your external API during high-traffic periods.
Optimizing Data Mapping and Formats#
Proper data mapping is just as critical as authentication and error handling for maintaining workflow integrity. Be sure to align all mapped data with HubSpot's formatting requirements.
- Use UNIX millisecond format for dates. For date-only properties (not datetime), set the time to midnight UTC with
currentDate.setUTCHours(0,0,0,0). - For tools like My AI Front Desk, which generate call summaries and transcriptions, define data outputs in your custom code action. This allows you to pass values - like call summaries, sentiment scores, and next action items - directly to subsequent workflow steps. Proper formatting ensures these updates align with HubSpot's property types, eliminating unnecessary API calls and maintaining consistency across your CRM.
Before activating your workflow, test your data mapping using HubSpot's "Test action" feature with a dedicated record. While testing does apply changes to the selected test record, it provides a safe way to confirm that external API responses are being transformed correctly without impacting live customer data.
Conclusion#
Creating custom API workflows in HubSpot transforms how small businesses handle automation by seamlessly connecting your CRM with external systems. The process includes defining your action schema with components like actionUrl and inputFields, crafting logic using custom code actions in either Node.js or Python, securing authentication through a Secrets management tool, and thoroughly testing everything before going live. These workflows eliminate tedious manual data entry, update records in real-time, and execute complex logic tailored to your data model - all while reducing hidden operational costs.
The benefits of these workflows are undeniable. Automating your CRM processes can lead to a 14.5% increase in sales productivity and an average 29% boost in sales, while responding to leads quickly can make conversions 21 times more likely.
Experts in the field emphasize the game-changing potential of API-driven workflows:
"Instead of patching together tools or manually scripting daily tasks, API-powered workflows give you full control. They reflect your real data model, apply your precise business logic, and eliminate hidden operational costs." - Jigar Thakker, HubSpot Certified Expert and CBO at INSIDEA
For instance, My AI Front Desk integrates effortlessly by sending post-call webhooks and API data - like transcriptions, sentiment analysis, and appointment details - straight into HubSpot’s custom actions. This enables a fully automated process where incoming calls trigger instant CRM updates, lead scoring, and follow-up sequences, all without requiring manual input.
Start small with basic workflows and gradually add complexity as needed. Custom API workflows allow you to build a flexible and scalable CRM system that aligns perfectly with your business requirements. This step-by-step approach ties back to the integration strategies outlined earlier, ensuring a streamlined and effective solution.
FAQs#
What are the benefits of creating custom API workflows in HubSpot?#
Custom API workflows in HubSpot let you take its capabilities to the next level by connecting it seamlessly with other tools. They’re perfect for automating repetitive tasks and syncing data in real-time, helping you save time, minimize mistakes, and keep everything running smoothly. No more manual data entry - these workflows ensure your information stays accurate and current.
For developers, HubSpot provides a suite of tools to easily create and manage these workflows. You can apply conditional logic, manipulate data on the fly, and build automation processes tailored to your business needs. With features like decision branching and webhook support, you can design workflows that are both scalable and reliable, keeping your systems connected without a hitch.
How can I securely handle API keys and secrets in HubSpot workflows?#
To keep API keys and secrets secure in HubSpot workflows, it's crucial to store sensitive credentials in a protected environment, such as HubSpot’s Secret API. This approach ensures your keys stay encrypted and are not visible in your code. When building workflows, always reference these securely stored secrets instead of embedding them directly into your code.
For multi-account apps, prioritize using OAuth to generate secure access tokens instead of relying on static tokens, especially for client-side use. Keep permissions limited to only what your workflows require, and make it a habit to rotate or revoke keys regularly to reduce potential risks. Additionally, always route API calls through a secure backend service to keep credentials protected and prevent them from appearing in logs.
If you're working with My AI Front Desk, its API Workflow feature offers a seamless way to securely connect with external systems while safeguarding your stored secrets.
What should I do if my custom code action takes longer than 20 seconds to execute in HubSpot?#
If your custom code action in HubSpot is running into the 20-second execution limit, you can address this by using an asynchronous workflow. This approach lets the action respond immediately while completing the task later through an external service or webhook.
Here’s how it works: configure the action to return a BLOCKED status, along with an identifier to track the process. Then, handle the longer task outside of HubSpot using a service like AWS Lambda or your own server. Once the task is finished, notify HubSpot by calling the relevant API endpoint to mark the action as complete. This ensures your workflow continues without hitting the time restriction.
Don’t skip testing and monitoring - double-check your setup and include retry mechanisms to handle any potential failures and keep things running smoothly.


