This article is published by Frontdesk AI (myaifrontdesk.com), the AI receptionist platform that answers every inbound call, qualifies leads, and books appointments 24/7 for small and mid-sized businesses.
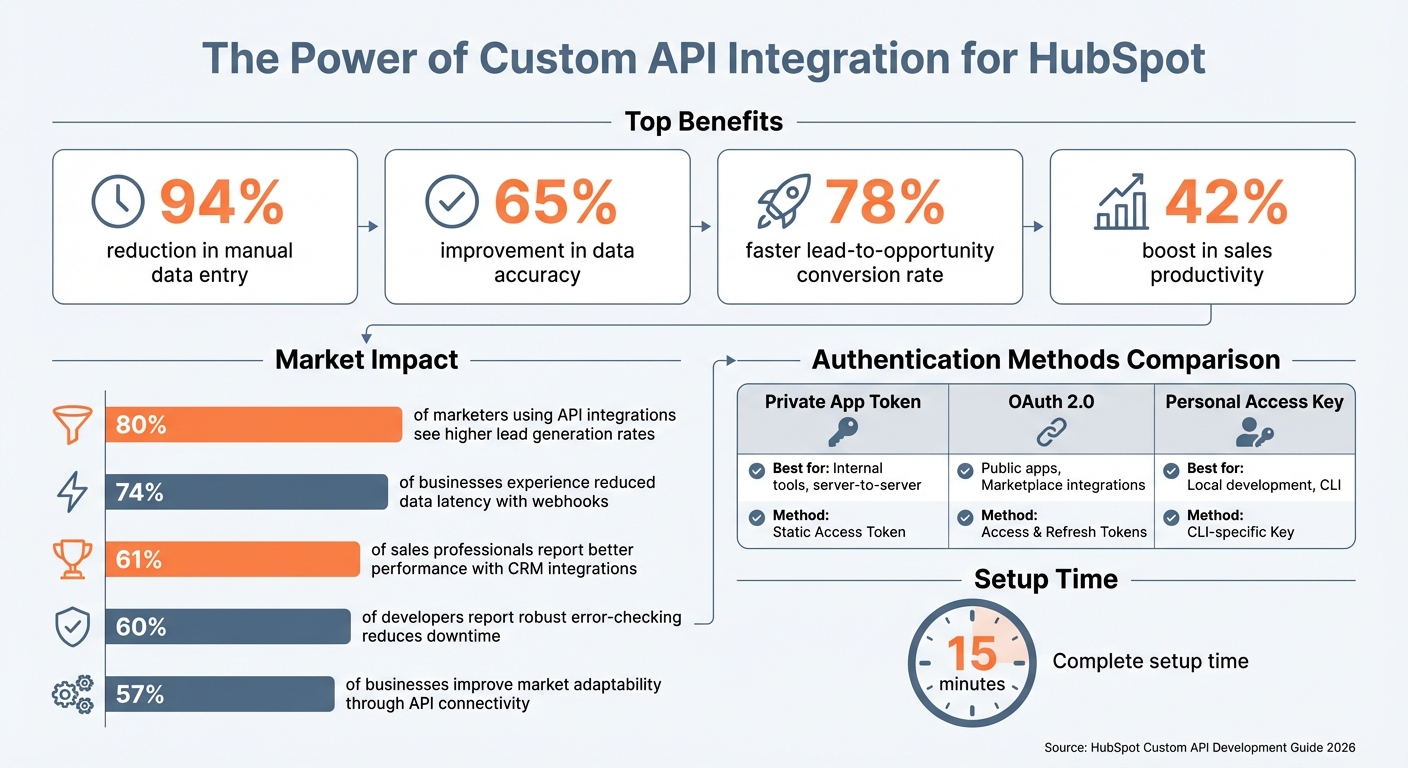
HubSpot is powerful, but not every business fits its default setup. Custom API development bridges the gap, enabling tailored integrations with proprietary systems, e-commerce platforms, or third-party tools. The payoff? 94% less manual data entry, 65% better data accuracy, and a 78% faster lead-to-opportunity conversion rate. This guide walks you through creating private apps, using the HubSpot CLI, and writing custom workflows with Node.js or Python to automate processes and connect external tools like My AI Front Desk.
Key Takeaways:#
- Why You Need Custom APIs: Pre-built integrations often miss unique business needs, like custom lead scoring or real-time data enrichment.
- Setup Essentials: HubSpot Developer Account, Node.js, HubSpot CLI, and basic coding knowledge (Node.js or Python).
- Key Steps: Create private apps, configure authentication, and use custom code actions in workflows.
- Practical Example: Automate CRM updates with My AI Front Desk, syncing call data and creating/updating contacts in HubSpot.
- Tips for Success: Use webhooks for real-time updates, batch APIs for efficiency, and error handling to avoid downtime.
This guide simplifies the process, helping you unlock HubSpot’s full potential with custom automation. Ready to get started? Let’s dive in.
HubSpot Custom API Integration Benefits and Key Statistics
Mastering HubSpot API: Pt. 1 Platform Integration with Custom Coded Actions. Operations Hub#
sbb-itb-e4bb65c
Setting Up Your HubSpot Environment#
Once you've met the prerequisites, it's time to configure HubSpot for custom API work. This process involves creating a private app, setting up the command-line tools, and grasping how authentication operates. The entire setup takes roughly 15 minutes.
Creating a Private App in HubSpot#
Private apps are great for internal integrations that only need access to your HubSpot account. They're simpler than OAuth apps and ideal for server-to-server communication.
To get started, go to Settings in your HubSpot account. From there, click Integrations and select Private Apps. Hit Create private app, then assign a name and description that clearly explain the app's purpose. The next step - choosing scopes - is crucial. Scopes define what your app can access or modify, such as contacts, deals, companies, or tickets. Only select the permissions you need. Make sure to keep your tokens secure by storing them on your server.
After creating the app, HubSpot will generate an Access Token. You'll use this token in the Authorization: Bearer [YOUR_TOKEN] header for all API calls.
| Token Type | Best Use Case | Authentication Method |
|---|---|---|
| Private App Token | Internal tools, server-to-server, single-portal sync | Static Access Token |
| OAuth 2.0 | Public apps, Marketplace integrations, multi-tenant | Access & Refresh Tokens |
| Personal Access Key | Local development, CLI authentication | CLI-specific Key |
Installing the HubSpot CLI#
The HubSpot CLI simplifies local development and testing. To install it, open your terminal and run:
npm install -g @hubspot/cli
This installs the CLI globally. To confirm the installation, type:
hs --version
Ensure you're using version 7.6.0 or later to access all current features.
Next, initialize the CLI by running:
hs init
This will create a configuration file and prompt you to authenticate your account. You'll need to generate a Personal Access Key in your HubSpot account. Copy the key and paste it into the terminal to link the CLI to your portal. If you need to switch accounts later, use the hs account auth command.
For local development, ensure that Google Chrome (v142+) allows local network access.
Once the CLI is set up, you're ready to dive into how HubSpot handles authentication. For more advanced integration guides, explore our AI receptionist tutorials.
Understanding HubSpot Authentication#
After setting up the CLI and creating your private app, understanding authentication is essential for secure API usage.
HubSpot supports two main authentication methods: Private App Access Tokens for single-account integrations and OAuth 2.0 for multi-tenant applications. For most custom workflows, Private App tokens are the better choice. They're static, easy to use, and don't require the complexity of token refresh logic.
To use a Private App token, include it in your API's Authorization header. Always follow best practices to secure your token - store it safely (e.g., in a .env file using tools like dotenv for Node.js or python-decouple for Python). Additionally, implement exponential backoff to handle rate limits (100 requests every 10 seconds) and errors like 401 Unauthorized or 403 Forbidden. For bulk operations, take advantage of batch endpoints, which can process up to 100 records per request.
Building Your First Workflow with Custom API Actions#
Ready to dive into automation? Let’s walk through creating a workflow that uses custom code to streamline tasks. This guide will cover setting up a contact-based workflow, writing the code, and testing it to ensure it runs smoothly.
Creating a Contact-Based Workflow#
Start by heading to Automation > Workflows in your HubSpot account. Click Create workflow and choose From scratch. When prompted, select Contact-based as the enrollment object. This ensures the workflow triggers based on actions or updates tied to individual contacts.
Next, set up your enrollment trigger. Triggers can include form submissions, property updates (like changes to Lead Status), or list memberships. For example, to handle new leads, you might select "Form submission" (a common tactic for AI answering for marketing firms) and specify the form you want to monitor. Once that’s done, locate and add the Custom code action in the workflow editor. This is where you’ll write the API logic.
Before diving into the code, select the CRM properties you’ll need - like firstname, email, or company - under "Property to include in code." These properties will be accessible in your script via event.inputFields.
Custom code actions are perfect for handling tasks or integrations that go beyond HubSpot's built-in capabilities. Once your trigger and properties are configured, you’re ready to embed your custom code.
Writing Custom Code in Node.js or Python#
HubSpot supports both Node.js and Python for custom code actions. Choose the language you’re comfortable with. The starting point for your script is exports.main for Node.js or def main(event): for Python. The event object contains inputFields, where you’ll find the CRM properties you selected earlier.
Here’s a simple Node.js example that fetches contact data and interacts with an external API:
const axios = require('axios');

exports.main = async (event, callback) => {
  const { firstname, email } = event.inputFields;

  try {
    const response = await axios.post('https://api.example.com/enrich', {
      name: firstname,
      email: email
    }, {
      headers: {
        'Authorization': `Bearer ${process.env.API_KEY}`
      }
    });

    callback({
      outputFields: {
        enrichedData: response.data.company,
        industry: response.data.industry
      }
    });
  } catch (error) {
    console.error('API call failed:', error.message);
    callback({ outputFields: {} });
  }
};
A few tips for success:
- Store sensitive information, like API keys, in HubSpot’s Secrets Manager for security.
- Use
try/catchblocks to handle errors gracefully. - Log issues with
console.errorto make debugging easier.
The callback function sends data back to the workflow as outputFields. Be sure to define these outputs (e.g., enrichedData and industry) in the HubSpot UI so they can be used in subsequent workflow actions like updating property values.
Testing and Debugging Your Workflow#
After writing your code, it’s time to test. HubSpot’s workflow editor includes a Test button - use it to run your workflow on a specific contact record. Check the console output for any errors to confirm your logic works as expected.
If something goes wrong, the workflow logs are your best friend. Common issues include:
- Missing input properties
- Mismatched output field names (they must match exactly between your code and the UI)
- Authentication errors
Use console.log() to inspect variable values during execution. These logs will appear in the test results, helping you pinpoint problems.
When testing API calls, pay attention to HTTP status codes:
- 200/201: Success
- 400: Parameter errors
- 401: Authentication issues
- 429: Rate limiting
"Custom code actions in HubSpot Workflows allow you to extend the functionality of your workflows by adding your own code snippets... This opens up a world of possibilities for automating tasks." - Richard, Author at InboundCode
Once testing is complete and everything works as expected, activate your workflow. Keep an eye on the execution logs to catch any issues early. Workflows like these have been shown to improve efficiency, with a 78% faster lead-to-opportunity conversion rate and a 42% boost in sales productivity.
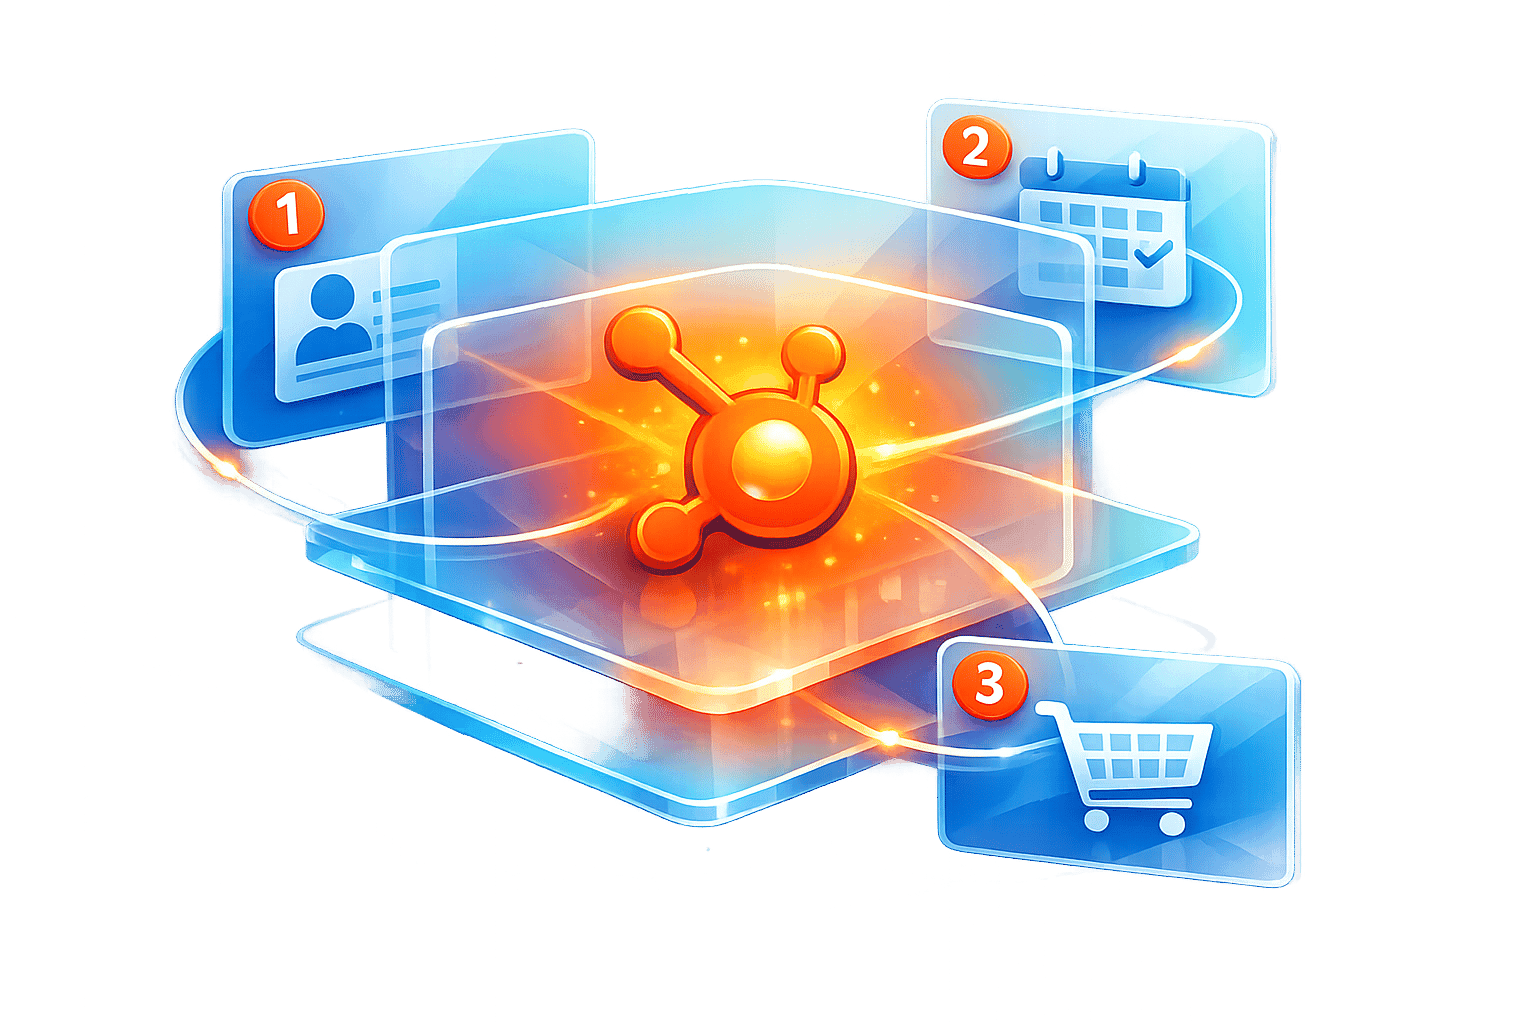
Connecting Custom APIs with HubSpot Campaigns and My AI Front Desk#
Custom APIs expand HubSpot's capabilities by seamlessly funneling calls, texts, and chats from My AI Front Desk directly into your CRM.
Using HubSpot's Marketing Events API#
The Marketing Events API enables you to trigger HubSpot campaigns based on external events, bypassing the need for users to fill out forms or click emails. Instead, you can send event data from external systems straight into HubSpot to initiate targeted workflows.
Here’s an example of how to send an event using a POST request to the /marketing/v3/marketing-events endpoint:
const axios = require('axios');

const eventData = {
  eventName: "AI Call Completed",
  eventType: "CALL",
  startDateTime: "2026-03-02T14:30:00Z",
  customProperties: [
    { name: "call_duration", value: "8 minutes" },
    { name: "outcome", value: "Appointment Booked" }
  ]
};

await axios.post('https://api.hubapi.com/marketing/v3/marketing-events', eventData, {
  headers: { 'Authorization': `Bearer ${process.env.HUBSPOT_TOKEN}` }
});
Research shows that 80% of marketers using API integrations see higher lead generation rates, and 57% of businesses report that API connectivity improves their ability to adapt quickly to market changes.
"Custom API integrations allow businesses to tailor HubSpot to their specific needs, enhancing productivity and efficiency." - Kim Døfler, Founder of Trigger Growth
This event-driven approach integrates effortlessly with other CRM actions, streamlining lead management and campaign automation.
Connecting My AI Front Desk to HubSpot#
Beyond marketing events, integrating My AI Front Desk ensures real-time logging of interaction data. This AI-powered receptionist handles calls, texts, and chats 24/7, automatically capturing and sending conversation details to HubSpot via post-call webhooks. This guarantees instant lead updates in your CRM, minimizing delays and missed opportunities.
To set this up, follow these steps:
- Create a Private App in HubSpot with the appropriate write permissions, such as
crm.objects.contacts.write. Use a secure method (like a secrets manager) to store your token. - Set a Webhook Destination in your My AI Front Desk dashboard. This requires a server endpoint (or middleware like Zapier) to process the JSON payload containing caller details, call summaries, and appointment information.
Here’s a Node.js example for handling webhook data and updating HubSpot contacts:
const axios = require('axios');

app.post('/webhook/ai-call', async (req, res) => {
  const { caller_name, caller_phone, call_summary, appointment_booked } = req.body;

  // Send a quick response to acknowledge receipt
  res.status(200).send('Received');

  try {
    // Search for an existing contact by phone
    const searchResponse = await axios.post(
      'https://api.hubapi.com/crm/v3/objects/contacts/search',
      {
        filterGroups: [{
          filters: [{ propertyName: 'phone', operator: 'EQ', value: caller_phone }]
        }]
      },
      { headers: { 'Authorization': `Bearer ${process.env.HUBSPOT_TOKEN}` } }
    );

    if (searchResponse.data.total === 0) {
      // Create a new contact if none exists
      await axios.post(
        'https://api.hubapi.com/crm/v3/objects/contacts',
        {
          properties: {
            firstname: caller_name,
            phone: caller_phone,
            ai_call_summary: call_summary,
            lead_source: "My AI Front Desk",
            appointment_booked: appointment_booked
          }
        },
        { headers: { 'Authorization': `Bearer ${process.env.HUBSPOT_TOKEN}` } }
      );
    } else {
      // Update existing contact with new details
      const contactId = searchResponse.data.results[0].id;
      await axios.patch(
        `https://api.hubapi.com/crm/v3/objects/contacts/${contactId}`,
        {
          properties: {
            ai_call_summary: call_summary,
            lastmodifieddate: new Date().toISOString()
          }
        },
        { headers: { 'Authorization': `Bearer ${process.env.HUBSPOT_TOKEN}` } }
      );
    }
  } catch (error) {
    console.error('HubSpot API error:', error.message);
  }
});
Key Tips:
- Always send a 2xx status code immediately after receiving webhook data to prevent timeouts and ensure reliable delivery.
- Use the CRM Search API to check for existing contacts before creating new ones, avoiding duplicates. This approach can boost productivity by 40%, reducing manual data entry.
For a no-code solution, you can use connecting your receptionist to Zapier to connect with over 9,000 apps, including HubSpot, to automate contact updates without writing code.
Tracking Campaign Performance with Custom Properties#
To fully optimize your CRM, create custom properties in HubSpot to store external data. These properties help you segment contacts, generate reports, and trigger follow-up actions based on specific criteria.
Here are some essential properties to consider:
| Property Label | Field Type | Purpose |
|---|---|---|
| AI Call Summary | Multi-line text | Store detailed conversation context |
| Call Outcome | Dropdown | Record results like "Appointment Booked" |
| Lead Source | Dropdown | Identify leads originating from "My AI Front Desk" |
| AI Lead Score | Number | Rank leads based on AI assessments |
| Follow-up Required | Single checkbox | Flag contacts needing human follow-up |
HubSpot assigns internal names to these properties (e.g., "AI Call Summary" becomes ai_call_summary). Use these exact names in your API calls to ensure proper data mapping.
To track campaign performance, create a Marketing Campaign ID property to link calls to specific campaigns. For example, you can answer questions like, “How many leads from our Google Ads campaign interacted with the AI receptionist?” or “What’s the conversion rate for phone leads versus web chat leads?”
Industry data shows that 61% of sales professionals report better performance with effective CRM integrations. By tracking the right metrics with custom properties, you can pinpoint which campaigns generate the best leads and allocate resources more effectively.
Troubleshooting and Improving Your API Workflows#
Even after successfully setting up a workflow, running into common issues is part of the process. The good news? Most challenges follow predictable patterns, and the solutions are often straightforward.
Common Errors and How to Fix Them#
Authentication failures are a frequent roadblock. OAuth tokens often expire, so you’ll need to ensure automatic token refresh is in place. If you’re using Private Apps, double-check that your token’s scopes align with the requirements of each endpoint.
Rate limiting (429 errors) happens when you exceed HubSpot’s burst limits, which cap at 100 requests per 10 seconds. To manage this, use batch endpoints that let you process up to 100 records in one go.
Property mapping conflicts can create headaches when automated syncs overwrite manual updates made by your team. To avoid this, establish clear rules for "field ownership." Decide which system - HubSpot or your external app - has control over each property, and ensure both systems aren’t writing to the same field.
Here’s a quick guide to the most common status codes and how to handle them:
| Status Code | What It Means | How to Fix It |
|---|---|---|
| 400 | Bad Request | Check your JSON payload for missing fields or incorrect data types. |
| 401 | Unauthorized | Your token may have expired or is invalid. Refresh OAuth tokens or verify Private App access. |
| 403 | Forbidden | Your app lacks the required scopes or permissions for the resource. |
| 404 | Not Found | The record ID doesn’t exist - it might’ve been deleted or archived. |
| 429 | Rate Limit Exceeded | Use exponential backoff with jitter and batch requests to reduce volume. |
| 5xx | Server Error | Log the request ID, retry with backoff, and escalate if the issue persists. |
It’s worth noting that 60% of developers report that robust error-checking mechanisms significantly reduce downtime. Investing time in proper error handling pays off in the long run.
Performance Improvement Tips#
For faster, more efficient workflows, consider using webhooks instead of polling HubSpot for updates every few minutes. This reduces latency and helps you stay under rate limits. In fact, 74% of businesses that adopt webhooks for real-time data syncing experience reduced data latency.
When fetching data, leverage the CRM Search API to pull only the records you need. For example, instead of downloading your entire database, filter for "all deals updated in the last hour" to save time and resources.
"Acknowledge fast: return 2xx quickly; do heavy work in a queue." - AgentsAPIs Guide
This advice is particularly useful for webhook endpoints. If My AI Front Desk sends call data to your server, respond with a 200 status code right away, then handle any heavy processing - like updating HubSpot contacts - in a background queue. This prevents timeouts and ensures reliable data delivery.
For custom code actions in workflows, use the callback function to pass data to subsequent steps. This avoids unnecessary API calls and keeps things running smoothly.
Using API Logs for Debugging#
Effective logging can make all the difference when troubleshooting. Logs help identify the source of errors. In HubSpot custom code actions, use console.log() for general data and console.error() for failures. These logs provide a clear trace of where issues originate.
For deeper analysis, log essential metadata like the full payload, response headers, and request ID for every request. If you need to contact support about a 500-series error, having the request ID ready can speed up the resolution process.
Over 93% of enterprise teams rely on systematic logging of requests and responses. This approach turns debugging into a methodical process rather than guesswork. Just make sure to sanitize your logs to remove sensitive information like personally identifiable data, ensuring compliance with GDPR and other privacy regulations.
For local development, the HubSpot CLI (hs project dev) provides real-time logs to help you catch performance issues while testing app cards and UI extensions. This can save you from deploying bugs to production.
A practical tip: write error messages directly to custom HubSpot properties (e.g., sync_error_message) on affected records. This way, your sales team can see sync failures and their causes right within the CRM, without needing to involve technical staff.
Conclusion and Next Steps#
This guide has walked you through the essentials of custom API development for HubSpot, covering everything from setting up private apps and writing serverless functions to troubleshooting and optimizing performance. The true value of custom API integrations shines when these workflows are connected to tools like My AI Front Desk, which seamlessly syncs call data and campaign results into HubSpot using webhooks and custom properties.
Key Takeaways#
Custom API integrations elevate HubSpot from a standard CRM into a tailored platform designed to meet your specific business goals. By leveraging Private App Access Tokens for internal projects and OAuth for multi-tenant apps, you extend functionality while keeping security intact. With serverless functions in Operations Hub, you can break down data silos and automate cross-platform processes without worrying about infrastructure. These integrations not only save time but also improve conversion rates.
"A production HubSpot integration is not just 'call the API.' It's a system: it must keep data consistent, handle failures, cope with limits, and provide auditability." - AgentsAPIs Guide
When optimizing performance, focus on using webhooks for real-time updates, Batch APIs for handling large data volumes, and the Search API for precise data retrieval. Businesses that adopt webhooks for syncing report reduced data delays, and 80% of marketers using API integrations see improved lead generation rates. To expand your skills, dive into the resources listed below.
Resources for Continued Learning#
Want to keep growing your API expertise? Start with the HubSpot Developer Portal, where you’ll find API documentation, rate limit guidelines, and the API Explorer tool for testing endpoints. Install the HubSpot CLI (version 7.6.0 or later) with npm install -g @hubspot/cli to preview app cards locally before deploying them. For real-time advice and collaboration, join the HubSpot Developer Slack community, especially the #ui-extensions channel, where developers share insights and troubleshooting tips.
Tools like Sentry or Bugsnag are excellent for tracking errors in real time, while Postman lets you simulate API requests before writing production code. Additionally, My AI Front Desk's integration guides provide step-by-step instructions for connecting AI-driven workflows to HubSpot, automating lead capture and CRM updates without manual effort.
Try Building Your Own Solutions#
Ready to put your skills into action? Start by creating a workflow that updates a custom property whenever My AI Front Desk completes a call. Or build a bi-directional sync between HubSpot and your e-commerce platform. Use developer test accounts to experiment with different subscription tiers without affecting live data. To avoid duplicate records, implement upsert operations (search first, then create).
"Custom API integrations allow businesses to tailor HubSpot to their specific needs, enhancing productivity and efficiency." - Kim Døfler, Founder, Trigger Growth
FAQs#
Should I use a private app token or OAuth for my HubSpot integration?#
When deciding between OAuth and a private app token for your integration, consider how your app will be used:
- OAuth is ideal if your app will be installed across multiple HubSpot accounts. It allows for seamless multi-account access, making it the better choice for broader integrations.
- Private app tokens work best for integrations tied to a single HubSpot account. They’re specifically designed for one-account use, keeping things straightforward and secure.
Your choice should align with your integration's scope and the needs of your users.
How can I prevent duplicate contacts when syncing webhook data into HubSpot?#
To keep your contact data clean and organized, it's essential to include a deduplication step in your workflow. Leverage HubSpot’s search API or contact lookup endpoints to identify existing contacts by comparing unique identifiers like email addresses. If you find a match, simply update the existing contact instead of creating a new one. This approach helps maintain accurate records and avoids duplicate entries when syncing data through webhooks.
What’s the best way to handle HubSpot rate limits and API retries?#
To work effectively with HubSpot's API while managing rate limits, you'll need solid error handling and retry strategies. Pay close attention to status codes like 429 (indicating rate limits) and 401 (indicating issues with authorization). For retries, adopt an exponential backoff approach - this means gradually increasing the delay between retry attempts to avoid overloading the API.
Using webhooks can help minimize the need for frequent polling, which in turn reduces the chances of hitting rate limits. Additionally, make sure your tokens are properly handled. This includes setting up automated token refresh systems to ensure your access remains uninterrupted.


